
Series 05
Kopo Kopo
Series 05
Kopo Kopo
Getting started
How to Connect Kopo Kopo to Your POS System (Step-by-Step)
Step by step: connect your Kopo Kopo account to your POS — API credentials, environment, till numbers, webhook subscription, and a test payment before you go live.
25 August 2026 · Kiosk
The good news: connecting Kopo Kopo to your POS is a one-time setup, and on Kiosk it takes about ten minutes — most of that spent copying credentials. The not-so-good news: there's one step most people skip, and it's the step that makes till payments appear in your sales automatically. This guide walks through all six steps, including that one.
This is the practical companion to the complete Kopo Kopo POS integration guide — the 'how, exactly.' Every step below is what you'd do on Kiosk.ke; the same shape — credentials, connect, test, activate, webhooks, test payment — applies to any POS that genuinely integrates Kopo Kopo.
What You Need Before You Start
- A Kopo Kopo account with a till (or paybill) — from app.kopokopo.com, or sandbox.kopokopo.com if you want to test first.
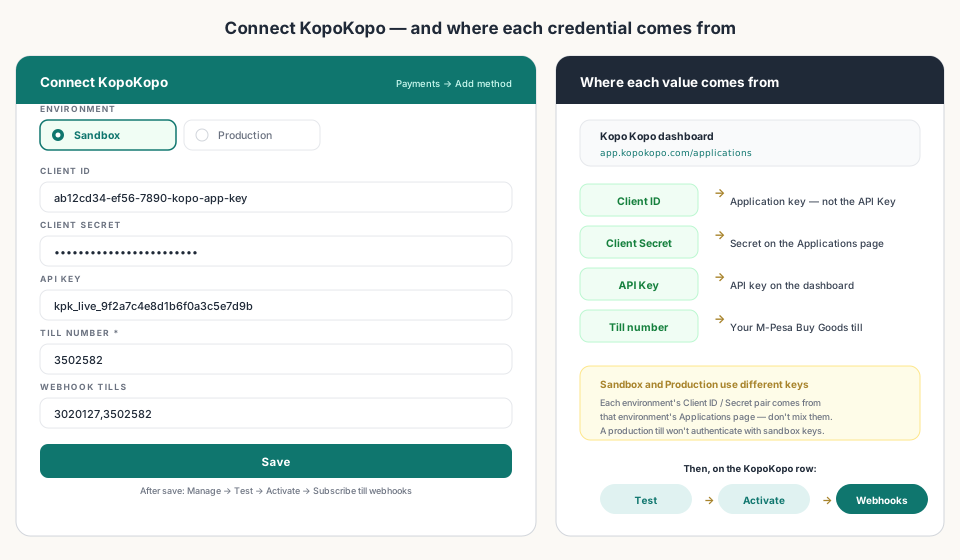
- Your API credentials: Client ID, Client Secret, and API Key — from the Applications page in your Kopo Kopo dashboard.
- A phone with M-Pesa for the test payment — ideally yours, so you control the PIN.
- About ten minutes, and the till number you want customers to pay.
Step 1 — Get Your Kopo Kopo Credentials
Sign in to your Kopo Kopo dashboard and open Applications. Copy three values: the Client ID (labeled an application key — it is not the API Key), the Client Secret, and the API Key.
Kopo Kopo gives sandbox and production separate credential pairs. If you're testing, use the sandbox dashboard; when you're ready for real money, switch to production and grab that environment's keys. Don't mix them — a production till won't authenticate with sandbox keys.
Step 2 — Add Kopo Kopo to Your POS
On Kiosk: Payments → Accept payments → Add method → KopoKopo. Paste the three credentials, pick Sandbox or Production, enter your till number — the one customers pay for STK Push — and add any other tills under Webhook tills.
The form is deliberately strict: the till number takes digits only and one number. Extra tills go in the comma-separated Webhook tills field, which is what Kiosk registers with Kopo Kopo so buy goods payments from any of those tills fire automatically.
Step 3 — Test the Connection
Kiosk calls Kopo Kopo with your credentials and confirms they work before anything goes live. Pass, and you get the go-ahead to activate. Fail, and the error points at the usual suspects: a wrong Client ID, a secret pasted with spaces, or sandbox keys on a production till.
Most connection failures are copy-paste problems. Re-check the environment first — that's the number one cause.
Step 4 — Activate
Activation is the switch that turns the gateway on for real STK Push and till matching. On Kiosk it only appears after the test passes — the product won't let you activate a gateway that can't reach Kopo Kopo.
Step 5 — Subscribe Your Till Webhooks (the Step People Skip)
This is the step that makes Buy Goods till payments land in your POS automatically. Kiosk tells Kopo Kopo which tills to notify — by till number — and registers a callback URL that receives the signed payment confirmations.
Skip this and STK Push still works, but customers who pay your till number directly won't sync — you're back to checking messages at close. The product even warns you: until the gateway is ACTIVE with webhooks subscribed, a manual 'Mpesa Till' row only prints instructions; it does not receive payments.
Step 6 — Run a Test Payment
- Ring up a small sale at the till — KES 10 is plenty.
- Pay it yourself with STK Push: M-Pesa → enter your number → confirm the prompt on your phone.
- Do it again the till way: pay your Buy Goods till directly and watch the sale complete when Kopo Kopo confirms.
- Check the sale record and the shift total — the payment should be there, matched, with no manual entry.
When both paths close a sale by themselves, you're live. Ring one real customer through and watch it happen.
After You're Live
Money settles to your Kopo Kopo account, and you withdraw to your bank from Kopo Kopo's dashboard — the POS never holds it. If a payment ever doesn't appear, it's almost always one of three things: a till not subscribed to webhooks, an environment mismatch, or a payment to a different till. Each has a quick fix.
Read next:
- Kopo Kopo Integration for POS Systems: The Complete GuideThe pillar guide — what Kopo Kopo is and how any POS connects to it.
- Kiosk.ke's Kopo Kopo IntegrationWhat the integration does once it's live — STK, till matching, Send Money.
- Kopo Kopo Buy Goods vs. Till Number vs. PaybillWhich payment channel belongs in your shop's till setup.
- Kopo Kopo API Webhooks Explained for Non-DevelopersWhat a signed payment notification is, in plain English.
- Why Your M-Pesa Payments Aren't Syncing with Your Sales RecordsThe three common causes — and their quick fixes.
Frequently asked questions
How long does it take to connect Kopo Kopo to a POS?
On Kiosk, about ten minutes once you have your credentials: add the gateway, paste the keys, pick an environment, Test, Activate, and Subscribe till webhooks. Add a test payment and you're done in under fifteen.
What do I need from Kopo Kopo before I start?
A Kopo Kopo account with a till (or paybill), and three API values from the Applications page in your Kopo Kopo dashboard: Client ID, Client Secret, and API Key. Note that the Client ID is the application key — not the API Key.
What is the difference between Sandbox and Production?
Sandbox is Kopo Kopo's test environment — no real money moves. Production is live payments. They use different credential pairs, and each environment's keys come from that environment's Applications page. A production till won't authenticate with sandbox keys.
What does 'Subscribe till webhooks' actually do?
It registers your till numbers with Kopo Kopo and points a callback URL at your POS, so the moment a customer pays your till, Kopo Kopo sends a signed payment notification and the sale completes automatically. Without it, till payments don't sync — even if STK Push works.
I have a Manual 'Mpesa Till' — is that the same as Kopo Kopo?
No. A manual till only prints your till number and paybill instructions on receipts; it does not receive payments or sync them. The KopoKopo gateway must be ACTIVE (Test → Activate → Subscribe till webhooks) for payments to match your sales.
How do I know the connection actually worked?
Ring up a small sale — KES 10 is plenty — and pay it two ways: by STK Push to your own phone, and by paying your Buy Goods till directly. In both cases the sale should close itself, and the shift record should show the matched payment with no manual entry.
Related articles
- PaymentsKopo Kopo Integration for POS Systems: The Complete GuideHow Kopo Kopo connects to a POS — Buy Goods tills, STK Push, and signed webhooks that match every M-Pesa payment to a sale automatically. The complete guide for Kenyan retailers.
- PaymentsKiosk.ke's Kopo Kopo Integration: Why It's the Best for Kenyan ShopsHow Kiosk.ke connects Kopo Kopo to your till — native STK Push, Buy Goods till matching, signed webhooks, and supplier Send Money — and why that makes it the best Kopo Kopo integration in Kenya.
- Getting startedSetting Up STK Push Checkout on Your POSHow STK Push checkout works at a Kenyan till — the customer gets the prompt on their phone, confirms the amount, and the sale closes itself. Setup, testing, and what can go wrong.
- PaymentsKopo Kopo Buy Goods vs. Till Number vs. Paybill: Which One for Your Shop?Buy Goods (till), Paybill, and STK Push all move money through M-Pesa — but they behave differently at the counter. Which one belongs in your shop's till setup?
- PaymentsKopo Kopo API Webhooks Explained for Non-DevelopersWebhooks are how your till finds out a payment happened — in plain English. What a signed payment notification is, why it beats checking messages, and what it means for your shop.
- PaymentsWhy Your M-Pesa Payments Aren't Syncing with Your Sales RecordsM-Pesa payments that never appear in your sales reports are usually one of five fixable problems — and the fix is almost always a real integration, not more manual checking.
Ready for a POS built for Kenya?
Start free on Kiosk.ke — barcode POS, native M-Pesa STK, offline sales, and an online storefront from one stock count.