
Suppliers & supplies
Suppliers, supplies & purchase orders
Add vendors, link products, order stock, confirm deliveries, and keep payables straight — with screenshots of every screen.
On this page
Three words carry your purchasing: Suppliers (who you buy from), Supplies (the delivery bills that raise stock), and Orders (the purchase orders you send before goods arrive). They link together — order first, confirm the delivery, and the supply appears with stock already raised. This guide walks the full loop with screenshots.
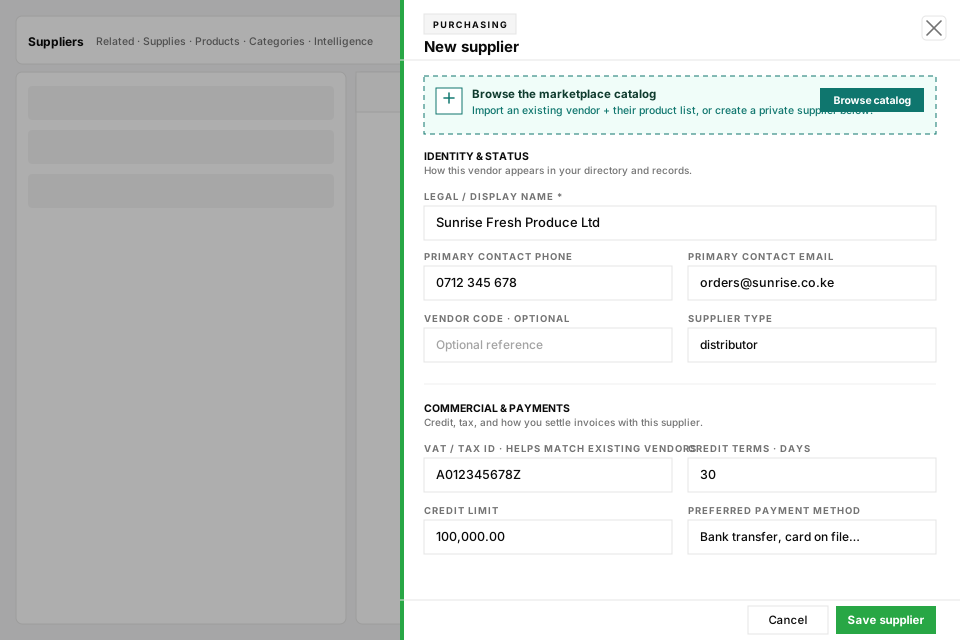
Step 1 — Add a supplier
Create each vendor once, before their first delivery, so every receipt, cost, and unpaid balance stays under the right name.
- Step 01Open Suppliers in the dashboard and tap New supplier.
- Step 02Enter the legal / display name, contact phone and email — the phone doubles as the WhatsApp number for orders.
- Step 03Add a VAT / tax ID if you have one; Kiosk uses it to match existing vendors so you never create duplicates.
- Step 04Set credit terms (e.g. 30 days) and a credit limit when they sell to you on account.
- Step 05Save. If they trade on the marketplace, you can also import the vendor plus their catalogue in one step.
Step 2 — Link products to the supplier
- Linked products form the supplier’s shelf: the exact list you see when ordering and when receiving.
- From the supplier profile, add each product they supply (with their SKU and your last cost).
- Or link while creating a product — the New product drawer has a Supplier field.
- Links carry cost and stock hints, so a New supply and an Order open pre-filled with sensible prices.
Step 3 — Order stock (purchase orders)
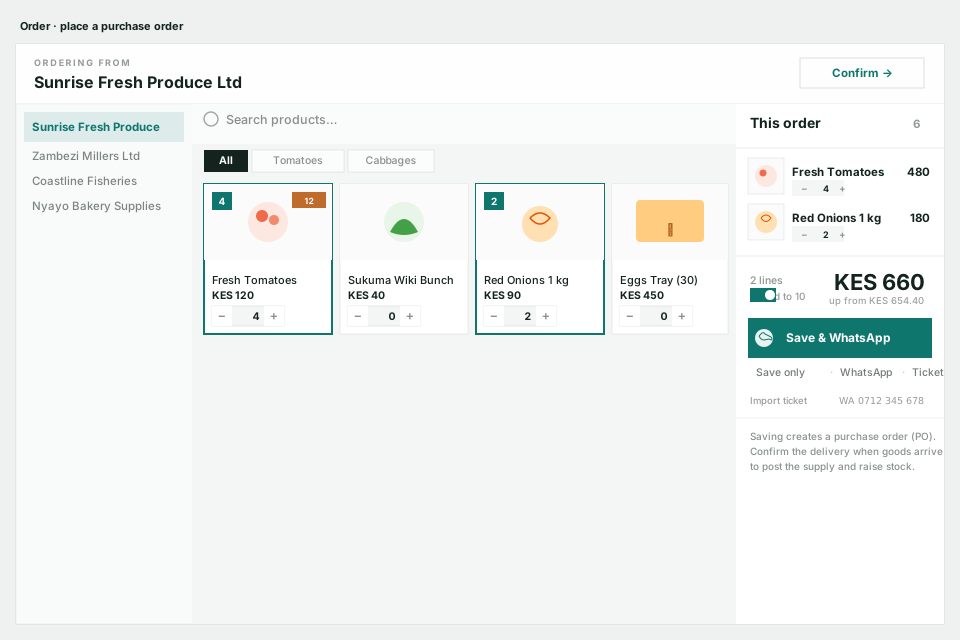
Order is a till-style screen built around the supplier’s shelf: pick the vendor, tap the products you need, set quantities, and send.
- Step 01Open Order from the dashboard sidebar.
- Step 02Pick the supplier — their linked products load as tiles with cost and low-stock badges.
- Step 03Tap products to add them; use +/− to set quantities. Search and family chips keep big catalogues fast.
- Step 04Review the slip on the right, then choose: Save & WhatsApp sends the order to their number, Save only stores the PO, and Ticket copies a shareable order link.
- Step 05Saving creates a purchase order (PO) with its own number — the supplier sees it on the portal when they are connected, or in the WhatsApp message you send.
Step 4 — Confirm the delivery
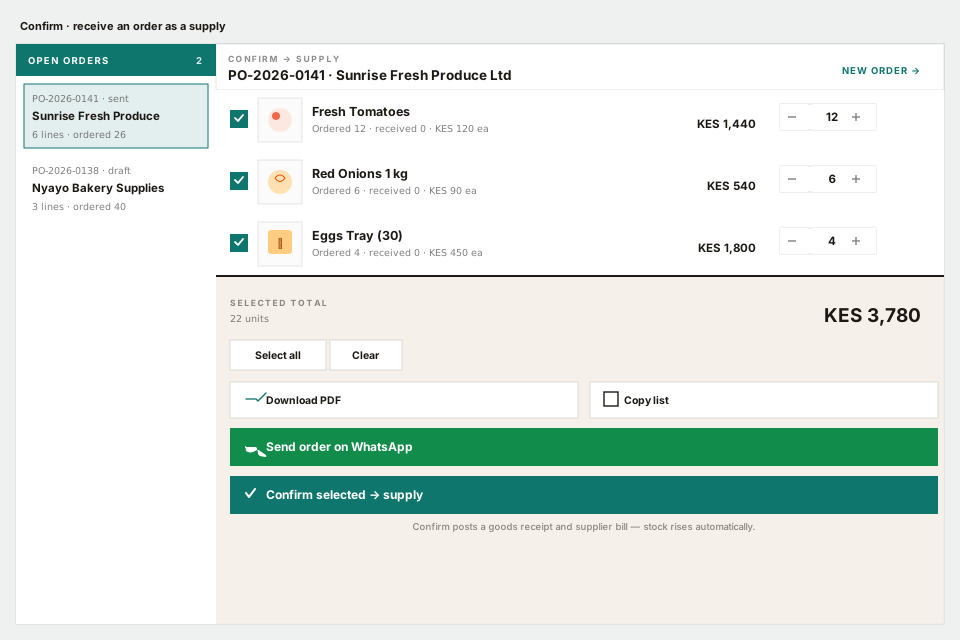
When the goods arrive, Confirm on the order screen turns the PO into a supply: it posts a goods receipt, creates a supplier bill, and raises stock for every line you received.
- Step 01Open the order and tap Confirm (or visit Order → Confirm).
- Step 02Select the open order — its lines list what was ordered and what is still outstanding.
- Step 03Check the boxes and adjust the quantities to what actually arrived (short deliveries happen).
- Step 04Tap Confirm selected → supply. Stock rises automatically and the bill lands in Supplies.
Step 5 — Record a walk-in supply
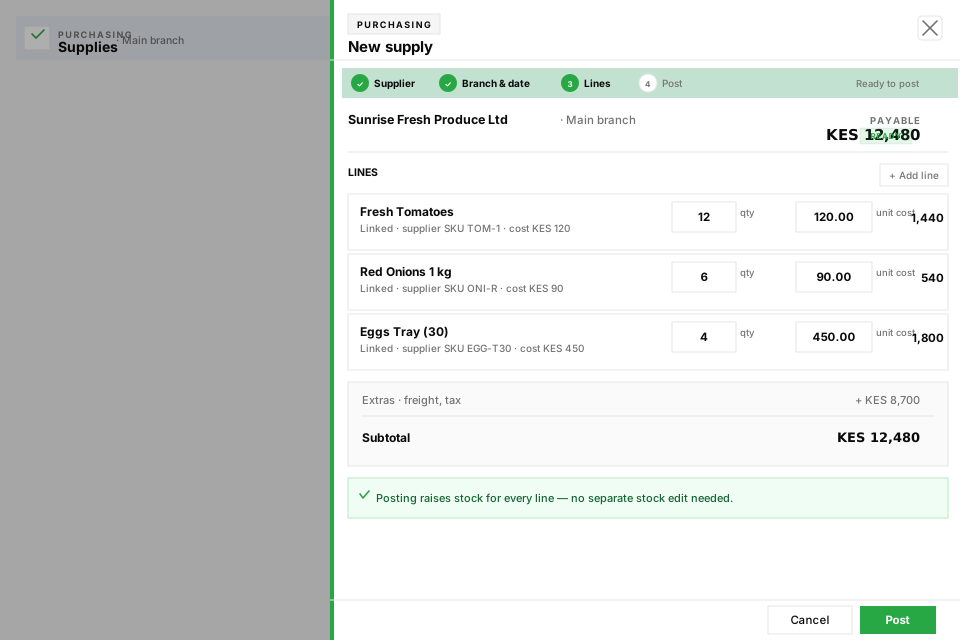
No order was placed? Record the delivery directly. New supply accepts linked products or ad-hoc lines, so you can receive even items you never linked.
- Step 01Open Supplies and tap New supply.
- Step 02Pick the supplier, the receiving branch, and the delivery date.
- Step 03Add lines: product (search the catalogue), quantity received, and unit cost from the invoice.
- Step 04Add extras like freight or tax if they belong on the bill, then Post.
Step 6 — Manage supplies and pay
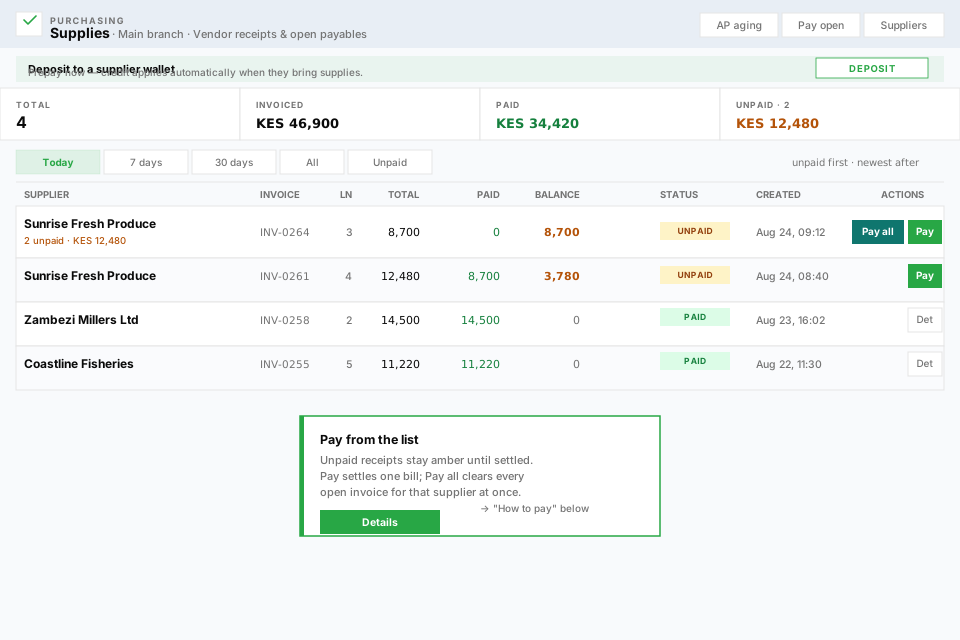
Supplies is your vendor ledger: every receipt with its total, what you have paid, and what is still open. The strip on top summarises the whole picture.
- Step 01Filter with the chips — Today, 7 days, 30 days, All, Unpaid — or jump straight to Pay open for anything outstanding.
- Step 02Pay settles one bill; Pay all clears every open invoice for that supplier in one go.
- Step 03Use Deposit to prepay a supplier wallet; the credit applies automatically when they next bring supplies.
- Step 04Open AP aging to see balances by age across every vendor, and pay from there when month-end comes.
Frequently asked
What is the difference between an order and a supply?
Can I skip ordering and just record a supply?
Why is my supplier’s shelf empty when I order?
What happens when I confirm an order?
How do deposits work?
Can I delete a supply?
Related articles
- Add a supplierSave vendor details once so every delivery, cost, and payable stays attached to the right person.
- Record a supply (receive stock)Post a vendor delivery so stock rises automatically and costs land on the right products.
- Why you should record every supplyPosting a supply updates stock automatically — and locks in cost, payables, and a clean audit trail.
- Understand stock levelsHow on-hand quantity updates after sales, supplies, and transfers.
- The complete supplier flow — from first vendor to final paymentFollow a vendor through every stage: create, link, order, receive, pay, and see their portal — with screenshots at each step.
Still stuck setting up?
Send a message with your business name and subdomain — we will help you get the till selling.