
Staff & branches
User roles & how to add users
Invite staff, pick the right role, assign branches and departments, and manage PINs and access — with screenshots of every screen.
On this page
Users are the people who can sign in to your workspace — at the dashboard, the till, or the grocery counter. A role decides what each person can see and do, and the branch narrows where they work. This guide walks through adding users, choosing roles, and managing access safely.
What is a role?
- A role is a bundle of permissions — one choice in the invite drawer decides what the person can see across the whole workspace.
- Owner sees and controls everything: users, roles, payment settings, billing, and branches.
- Managers run the day-to-day shop: catalog, stock, suppliers, supplies, and reports.
- Cashiers sell at the till. Branch-locked roles (cashier, stock manager, grocery clerk) can only work in their assigned branch.
- Stock managers handle stock levels, supplies, and stock takes — with optional toggles in Business → Operations.
- Grocery clerks get a kiosk-friendly counter and only the departments you assign to them.
Step 1 — Invite a user
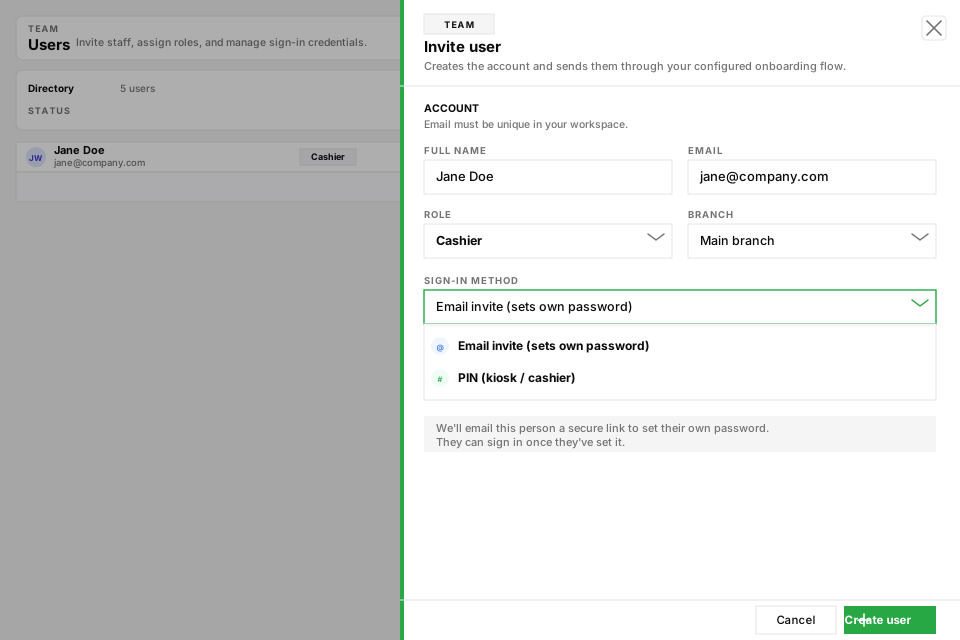
- Step 01Open Users in the dashboard and tap Invite user.
- Step 02Enter the full name and a unique work email.
- Step 03Pick the Role — owner, manager, cashier, stock manager, grocery clerk, and more.
- Step 04Pick the Branch, or leave it blank for someone who works everywhere (owners and managers usually).
- Step 05Choose the sign-in method: Email invite sends them a secure link to set their own password, or PIN creates a 4–6 digit till code for cashier-style access.
- Step 06Tap Create user. Email-invited people show as Invited until they finish setup; PIN users are active right away.
Step 2 — Manage the directory
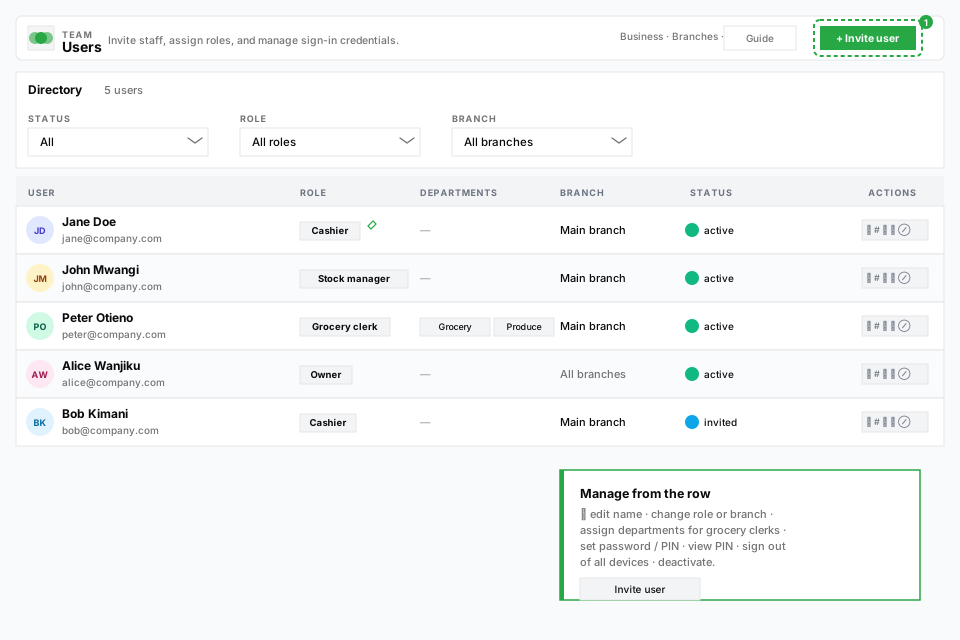
The Users page is a live directory. Every row shows the person, their role, departments, branch, status, and the actions you can take — all without opening a separate page.
- Filter by status (active, invited, suspended, locked), role, or branch to find anyone fast.
- Edit a name, change a role, or move someone to another branch with the pencil icons on the row.
- Grocery clerks show a Departments column — assign the sections they are allowed to see.
- Actions cover credentials and access: set a password, set or view a PIN, sign the person out of every device, or deactivate them.
Deactivate vs sign out — what is the difference?
- Sign out of all devices revokes every live session but keeps their password and PIN working — they can sign straight back in. Use it when a phone or till was left unattended.
- Deactivate is the strong move: the person loses access on every device until someone re-invites them. Use it when someone leaves or their access is being reviewed.
PIN login for the till
- Step 01Make sure the user has a branch assigned (PIN login is branch-scoped).
- Step 02Set a 4–6 digit PIN — either when inviting, or later from the row actions (the # icon).
- Step 03Cashiers unlock a shared till with their PIN instead of typing a long password.
- Step 04Forgot a PIN? An admin can view it from the row (👁 icon) or set a new one.
Departments for grocery clerks
Grocery clerks only see the departments you assign. Until an admin assigns at least one department, the clerk’s counter shows no items — assign departments right after creating the account, or when changing their role.
Security checklist
- One login per person — never pass around shared credentials.
- Assign the least privilege that works: cashiers sell, managers run, owners own.
- Deactivate leavers the same day, and sign out devices that were left behind.
- Keep PINs private; don’t write them on the till.
- Review the directory monthly — role drift creeps in as the shop grows.
Frequently asked
Which role should a new cashier get?
Can I change someone's role later?
A cashier forgot their PIN — what do I do?
What is the difference between deactivate and delete?
My grocery clerk sees no products — why?
An invited user never got the email — can I resend?
Related articles
- Add staff and rolesInvite cashiers and supervisors with the right access for their job.
- Invite your first staff memberGet a cashier onto the till quickly without sharing the owner password.
- Staff PIN login at the tillLet cashiers unlock a shared device with a short PIN instead of a long password.
- Work with multiple branchesTrack stock and sales per location when you run more than one shop.
- Get the most out of KioskThe master guide: one catalog, one till, one storefront. Follow the daily rhythm, then jump into every deeper guide from here.
Still stuck setting up?
Send a message with your business name and subdomain — we will help you get the till selling.